Thursday, March 1, 2012

~Doing It All Wrong~

I have a secret.  Ok, it's not really a secret.  More like an.... issue.  You see, I have stained trim throughout my house.  I don't have the typical gorgeous house with white trim, greige walls and white slipcovered furniture.  In fact, I have everything the way you are not suppose to have it.  I have white walls, golden oak trim.....everywhere.  I even have matching leather couch and loveseat.  I know.... the horror.  OH!  Even worse.....they RECLINE!!!  All of our furniture is big, mostly brown, and there is a lot of wood in our house.  We apparently like oak, and recliners and maybe even dead animals.  I forgot to mention that a deer head is going to be joining our decor soon. 

You see.  I LOVE MY HUSBAND!!!!  I am so blessed to have him.  As much as I would love to paint over my trim and buy the white slipcovered couches, I know that my husband would NOT enjoy that.  As much as I would like to think that since I am home more than anyone else and that I am the one taking care of this house, therefore, I should get to make ALL the decorating decisions pertaining to it, I know that my husband works really hard to provide this house for me and our kids.  As much as I love those houses with the white trim, white couches and greige walls..... I love my husband more. 

So, the next time you are thinking it is YOUR house and you are going to do whatever you want with it, think about the joy your husband will have when you tell him he can stuff his prize buck head and hang it in the house.  Trust me..... his reaction will be priceless:)

Thursday, February 9, 2012

~Easy Homemade Valentines for Boys (and Girls)~

Well, now that Thanksgiving, Christmas, New Years, Cancun, my birthday and the Super Bowl are over I am going to try to post less food.  Maybe once a week, maybe not.  I just don't know.  I feel like I have become a cooking blog and I want to be an EVERYTHING blog.  I don't ask for much, do I? 

I am in the working or thinking process of several projects.  I'll be honest, most of them are in the thinking process but that is because I am so indecisive that I just can't make up my mind.  I'm like that a lot

One thing I need to work on right away is valentines.  I usually buy them when they go on sale.  Like the 75-80% off sale........or more.  I'm cheap and I'm not ashamed to admit it.  I don't buy the ones with candy.  They cost more.  I buy the simple, plain ones that might come with a sticker that is meant to hold them shut but since they are so cheap they really don't do that well either.  This year is different though.  I am going to MAKE them.  That's right.  You heard me.  MAKE them.  You can hold the applause for my awesome greatness until later;)

I did some research, on pinterest and google, and found two designs that my boys really liked.  Little D was so cute and wanted to make super hero ones for the boys and flowers for the girls.  What a sweetheart.  N didn't care what the girls wanted and decided that everyone was going to get the same thing because he thought they were awesome.  That is totally fine with me as well. 

My goal in doing this was for it to be easy, fun and to be able to do it in one day.  Under two hours total would be an added bonus. 

Step one:  Buy any supplies I needed
    Glow stick bracelets (found at Michael's or the dollar store for.....$1 for 15.  I bought two and will    
    have leftovers.
    Blow Pops.  I went crazy with these because they weren't on sale and were $2 a package and I had
    to buy 2 packages.  Don't worry.  I didn't break the bank and I think we can still keep our electricity
    on.
    Card stock in white and multi colored construction paper.  I had this so I'm saying it's free even
    though it technically is not.  But since other bloggers like to say "Oh, I had this huge pile of wood
    to build a new headboard and upholster it with fabric that I bought last week, so this project was
    free." I'm going to as well.
    Computer, printer, ink, markers.....ah. you get the picture.

We'll start with the Star Wars themed Valentines.


    Here is the link to get the light saber handle printable.
    Print off as many of these as you need
    Punch a hole where the light saber comes out
    Push your glow stick bracelet through and tape it down on the underside.  
    DONE!!!  That was SUPER easy and great for boys!!!

Super Hero themed Valentines:

To make these I used my Cricut.  I made the cape by taking a pentagon and stretching it out in my "sure cuts a lot" program.  I actually cut these out myself because I was away from home at the time, but if you are home let the machine do the work.  I created the mask by using circles and rectangles and shrinking them down to the desired size and "welding" them together so it would cut them as one whole piece and not individual pieces.  Make sure all the shapes are overlapping slightly or it will still cut them as individual pieces.
More hot glue, a marker to create the eyes or lenses and WALLAH!!!  These were the most time consuming, but honestly, Most of the time spent was creating the mask and getting it just right. 

Onto the Flowers:

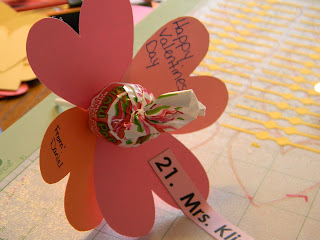
Again, I used my cricut.  It makes everything easier.  OK, maybe not cleaning.  I'm sure they are working on one that can do that as well though.  I took a heart shape and stretched it to the size I wanted.  Then I had them cut out on different colors of paper.  Hot glue four hearts together, punch a whole in the center, hot glue (love that stuff) the sucker to the "petals" and DONE!!!  I don't think it can get much easier.  I think I will even make valentines next year too.....maybe may day baskets, and something for St. Patricks day.  OK, I'm getting a little carried away now.

I seriously had so much fun making these and there are SO many different ideas for homemade valentines on the web, so don't be afraid to look, find and CREATE!


Sunday, February 5, 2012

~Superbowl Snacks~

OK.  This really IS about the Super Bowl.  I must face the fact that I have to share my birthday this year.  I'm OK with it.  I shared my wedding day with the Iowa, Iowa State football game.  All eyes were not on the bride that day.  Oh well.

What would a good football game be without some REALLY good food.  To the guys, it's still a good football game.  The food just makes it great!  To the girls, well, it's just another game.  That is if you are like me:)

For our Super Bowl we have made Creamy Chicken Taquitos, found here, potato skins, recipe to follow, bought buffalo wings, it is my birthday you know, and I am taking some of my red velvet cupcakes, if they stay here I will eat ALL of them.  My thighs will thank me later.

Recipe for Potato Skins:  Serves 20
You will need:
  • 10 large russet potatoes


  • salt and pepper


  • 10 -15 slices bacon (cooked until crisp and chopped) I used an entire package.


  • 3 -4 cups cheddar cheese    


  • 6 -7 green onions , finely chopped


  • sour cream 


  • Preheat oven to 400*. 
    Prepare potatoes for baking by washing, drying and then rubbing them with olive oil. 
    Bake for approx 1 hour or until the potatoes are tender.
    Cool until able to handle.
    Slice Potatoes in half, lengthwise.
    Scoop out the pulp, leaving approx 1/2 inch of pulp to help hold the skins together.
    Place the skins on a baking sheet, that is sprayed with cooking spray, and sprinkle with salt and pepper.
    Combine your cooked and chopped bacon with your cheddar cheese.
        (you can also add some garlic salt or cayenne pepper to the cheese mixture to add even more flavor)
    Evenly divide the cheese mixture into each skin.  (I had some cheese mixture left over and used it with my pulp that I scooped out.)
    You can cover at this point and refrigerate for 24 hours or bake them for 25 minutes or until the skins are crisp and the cheese is melted.
    Top with the sour cream and green onions.

    I prepared these yesterday and will bake them when I get to my party.

    By the way......  GO GIANTS!!!!!!!!!!!!!!!!!!!!!!!!!!


    Saturday, February 4, 2012

    ~Superbowl Sunday?~

    You may have noticed that I have been gone for a week, or two.  My husband and I took a MUCH needed trip away to celebrate our 10 year anniversary.  We went to Cancun and it was simply fabulous.  I just downloaded the pics and am still experiencing Cancun homesickness.  I REALLY wish we were still there.  I can still smell the food, feel the hot sun shining on me while I lay on the beach.

    I did this for 3 days straight!

    The other days we were travelling and sight seeing. 

    The best part of the trip was that I had my husband ALL.... TO.... MYSELF!!!  I think that is the part I am honestly missing the most. (Insert fussing, tattling kids...ugh)

    Now that we are back we get to celebrate something else.  Something on Sunday, which happens to be tomorrow.  Did you guess the Super Bowl?  Well, you are WRONG.  The Super Bowl is trying to steal my thunder this year by being on my birthday.  So, I have decided to celebrate for two days instead of one.  Actually, I tried to get 3 days but my husband thought that was being selfish.  He actually thought 2 days was selfish until he asked if we could take 2 vehicles to our Super Bowl destination, so he could stay later than the kids and I.  When I said no, he seemed much more willing to celebrate me for 2 days.  I am special, you know. 

    So, what did I do today.  Well, Big D has been incredibly loving.  That's a great present all on it's own, but I decided to make my FAVORITE cake.  Red velvet cup cakes.  Not from a mix but from scratch.  For the first time EVER.... 

    Here's how I did it.

    Recipe is from Annie's Eats

    Ingredients:

    (makes 24 cupcakes)
    2½ cups cake flour
    1½ cups sugar
    1 tsp. baking soda
    1 Tbsp. cocoa powder, sifted
    1 tsp. salt
    2 large eggs
    1½ cups vegetable oil
    1 cup buttermilk
    2 Tbsp. (1 oz.) liquid red food coloring (two of the little red coloring in my pic)
    1 tsp. vanilla extract
    1 tsp. distilled white vinegar

    Note: I ran out of buttermilk before I made the cupcakes but I did find out that if you take 1 Tbsp. of white vinegar and then fill the cup up to the 1 cup mark with milk, then let sit for 5 minutes, you will have a homemade version of buttermilk.

    Frosting:

    8 oz. cream cheese (room temp.)
    5 Tbsp. unsalted butter (room temp.)
    2 tsp. vanilla extract
    2½ cups confectioners sugar, sifted

    Add all the dry ingredients together in a medium size bowl and mix together with a wisk.  In a large mixer bowl mix together all your wet ingredients.
    Gradually mix the dry ingredients into the wet ingredients.


    Oops.  I forgot to list something else you will need.

    Cute liners!

    Put your liners in your muffin pan and spray with cooking spray.
    Fill each liner about 3/4 full.
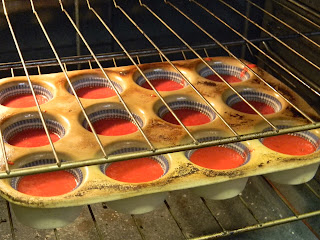
    Bake for 9 minutes in a 350* preheated oven.

    Turn pan 180* and bake for 9 more minutes, or until toothpick inserted into the center comes out clean.
    Cool in pan for 5-10 minutes and then move to a wire rack.

    For the frosting:
    Cream the butter and cream cheese together.
    Add the vanilla and mix.
    Gradually add the sifted powdered sugar.

    Frost and Enjoy!!!
    Not that one though.  It's mine;)


    Monday, January 23, 2012

    ~Tortellini Soup~

    I had this over Christmas at my in-laws house.  My husband and I LOVED it.  I'm pretty sure we each had 3 bowls. Soooooooooooooooooooooooooooooooooooooooo goooooooooooooooooooooooooood!

    Tortellini Soup:

    1 lg chopped onion
    2 cloves minced garlic
    1 T olive oil
    3 cans beef broth (14 oz each)
    1 14.5 oz can stewed tomatoes
    1/2 or 3/4 cup Picante sauce ( I used salsa because I didn't have this)
    1 T basil
    1 diced green pepper ( I didn't have, but my salsa had some green pepper in it.  Close enough:))
    3 diced carrots
    3 diced stems of celery
    1 lb browned ground beef
    1 pkg cheese tortellini

    Cook onion, pepper and garlic in oil until tender (approx. 6 minutes).  Add remaining ingredients (except tortellini) and bring to boil.  Reduce heat and simmer until vegetables are to desired tenderness.  Add tortellini 10-15 minutes before serving. 
    You just need to heat through the tortellini and that doesn't take too long, so watch it!

    We topped this with Parmesan cheese and served with homemade Italian herb bread.

    Monday, January 16, 2012

    ~Pumpkin Gingerbread Muffins~

    I got this recipe from here.  If you don't know her you should definitely check her out.  She has great tips on how to make healthier foods that your kids will enjoy, as well as tips on how to save money and keep the little ones entertained. 
    I am a huge fan of pumpkin.  I love pumpkin bread, bars and now muffins. Unfortunately my husband does not share this love, so I never make anything because then I will eat. it. all.  Not a good thing for my dieting.  I actually made this recipe for some friends of mine who just had a baby.  I wanted to make a desert that was somewhat healthy as these friends are also aware of what they are putting into their bodies.  It made a huge batch and I kept a few at home for my family to enjoy, but not enough for me to engorge myself.  To my pleasant surprise, my husband loved them!!!  Yay for me... I mean, I'm glad I can please my husband by making something both delicious and healthy. 

    Pumpkin Gingerbread Muffins:

    1cup all-purpose flour                                                        
    1 cup whole wheat  flour
    2 teaspoons baking powder
    2 teaspoons ground ginger
    1 teaspoon ground cinnamon
    1/4 teaspoon ground nutmeg
    1/4 teaspoon salt
    1 cup sugar
    1/2 cup canola oil
    2 eggs
    2 teaspoons vanilla extract
    1 cup canned pumpkin puree

    Preheat oven to 350°F. s
    Spray a mini muffin tin with cooking spray
    In a large mixing bowl, stir together flours, baking powder, ginger, cinnamon, nutmeg, salt and sugar. In a separate medium bowl, whisk together oil, eggs, vanilla and pumpkin.
    Add to flour mixture and stir to combine.
    Spoon batter into prepared pan and bake for 15 minutes, or until done when tested with a toothpick.
    Move muffins to a wire rack to cool

    Londa topped hers with a maple powdered sugar glaze. YUM!!! 
    But they are just a delicious without the glaze. 

    Note:  I like to make mini ones because they are bite size if you have a large mouth like mine.  Then you can justify eating 12 of them because that is just 12 bites, and 12 bites isn't too much of anything.... right?!?
    Also, one can of pumpkin puree is just under 2 cups, so I like to double my recipe and freeze a batch, or take some to nice neighbors who snow blow our driveway for us because our little snow blower cannot handle some of the Iowa snowstorms, or when the street plow goes by and pushes 2 feet of snow at the end of our driveway.  I have nice neighbors.  And that was not this year.  This year we have yet to get any measurable snow and it is suppose to get close to 60 today.  60 in January, in Iowa???  I know....weird!


    Friday, January 13, 2012

    ~Lantern Love~

    There are a couple of things that I am slightly obsessed with..... red velvet cake anything and lanterns.  Unfortunately one is totally not good for you and the other usually costs more than the cash I have to spend on it.  I do have a few around my house and they are always displayed somewhere.  Every single one, which means all four of them.  I know, poor me:( 
    So today I'm envying sharing some fab finds on the internet.  I can dream, can't I???

    Side note:  if you google "lanterns" and it suggests "lanterns on the lake"  it is not really pictures of lanterns on an actual lake.  It is a rock group.  Kind of a weird name for a rock group if you ask me, but whatever!


    Wednesday, January 11, 2012

    ~Low Carb Bacon Wrapped Chicken~

        First note:  this is low carb, not low fat.  That being said, let's continue

     A few years ago I tried the ever (at the time) famous low carb Atkins diet.  I didn't do it to a "T".... I don't do anything to a "T", but I worked hard at cutting back on rice, flour, bread, pasts.... you know, all the GOOD stuff.  I ate eggs for breakfast, salad for lunch with dressing a chicken or salmon and then LOTS of meat and veggies for supper.  If I had a good day I would allow myself to have either sugar free chocolate pudding or sugar free jello.  Honestly the diet wasn't that bad.  I had a huge headache for the first several days as my body was detoxing from the previous overload of carbs, but other than that, It was easy peasy.  This was a recipe that I had taken from a low carb cookbook and my family loves it!!

            Second note:  I no longer do the low carb diet (because I just love carbs too darn much) but I still try to limit the carbs.  Pasta is ok, just not every night.

            Bacon Wrapped Chicken:  Chicken breasts flattened to 1/4 inch thickness ( I found this to be extremely messy and hard to do, so I just fillet it lengthwise and don't worry about the thickness)
    Container of Onion and Chive Cream Cheese
    1 pkg bacon

            Third note:  The recipe also called for butter, but you don't need it.  You don't need the extra fat and the chicken stays just as moist without it.

    Fillet the chicken breasts in half lengthwise

    Soften the cream cheese and then spread on each half with a spoon (Softening really makes this easy.  I didn't find that out until last week.  Oh well!)


    Roll up the chicken starting on the short side.  Then wrap it up with a couple of slices of bacon and place in a baking dish.

    It should look like this:  Yumm!!


    Bake at 400* for 40-60 minutes (it depends on the thickness and size of the chicken breasts that you are using.  I like to move the dish to the top of the oven and turn on the broiler for the last 5 minutes.  It makes the bacon a little more crispy.

    Fourth note:  The chicken breasts will appear pink next to the bacon because the bacon does it's thing and kind of smokes the chicken.

    I like to serve this with rice and green beans.  You will have to imagine that lovely plate because we again ate it before I thought about taking a final picture. :)

    Monday, January 9, 2012

    ~Abort Mission~

    That is how I felt on Saturday. Beaten down, defeated, Weak and weary. I had just blogged about completing my first week of one of my new year resolutions. I had left out of my post that I didn't start those daily chores until my kids went back to school on Wednesday and that I was still determined to get EVERYTHING done, so I squeezed Monday and Tuesday's chores into Wednesday and Thursday which were also days that I was gone for the majority of the day working and running some errands. WHEW! Talk about run on.... I think I do that a lot in my writing as well;)

    Managing to get everything accomplished, especially on the shortened time frame, made me feel like super woman. I had cleaned, shopped, worked, made home cooked meals, ran kids to activities and so forth, and i survived! That was until yesterday. Apparently it only takes a ravine, a few extra kids, a husband in charge while I shop for more tile, and one hour. That's right, one hour to destroy my perfect house.

    I might be exaggerating a bit. It was really only two bathrooms who had a confrontation with the dirt from the ravine. The dirt won by the way. The rest of the house just looked like a stuffed animal toy factory had thrown up all over. I had no idea we had so many stuffed animals. Either neighbor kids are contributing to my youngest child's obsession or Toy Story is true and the animals come to life, and breed.

    As I was cleaning the bathrooms, again, I started to laugh hysterically. I hadn't really cleaned these bathrooms in a while. A quick wipe down or just the toilet in the half bath. The kids bathroom scares me so I try not to venture into it if I don't have to. I have never had this happen before. That is, until I decide to deep clean, even wash the rugs (which now have to be rewashed because my middle son got dirt all over them, then took a shower and got water all over the rug). Do you know what dirt and water make? That's right.....it's mud. How can I be mad though. Oh, I was at first, but it is just so comical. They did nothing wrong. The dirt wasn't even from their shoes. Somehow it just got on every inch of D's clothing. He said he's sorry.....I said I forgive him and God is giving me another week to clean them again.

    How fortunate am I!

    Saturday, January 7, 2012

    ~Free 2012 Printable Calendar~

        I LOVE FREEBIES!!!!  Especially pretty freebies that help me with my goal of staying organized.  I have calendars absolutely everywhere.  In my purse, on the refrigerator, in the pantry, on the ipad, in my family binder..... and I use them all.  The one on the fridge is mainly for meals and events that might require me to think ahead for the meal, but otherwise they will have the kids' schedules.  I can't seem to keep up with everything, or I tend to forget when someone gets picked up or dropped off.  It's just good for me to have a calendar readily available at all times.

    I found this website last year after googling free calendars.  It is perfect for my computer nook.  It is pretty and yet has a fair amount of room to write stuff for each day.  I have mine framed in a dollar tree frame and I use a wet erase marker on it so I can add and take events off easily.


    She just posted this years free calendar!!  Enjoy, and thanks 505 Five O' Five Design + Paper!!

    Friday, January 6, 2012

    ~New Year Resolutions: Week One~

        Well, week one of 2012 is almost over and I have completed one, of however many weeks there are in a year, of my new year resolutions.  Mission Organization.  Actually it's just one step in the process, but a HUGE one and a very important one to me. 
        I showed you my family binder here and it has not left my side this entire week.  I spent a day last weekend, filling in some of the freebie forms that I had printed out, including the daily to do's.  I only put chores on the days and then I have a daily to do that I fill out every evening with places I need to go, things I need to get, what's for supper and what I need to do for the following day.  It's a great form where I can gather all of my information into one place and I actually leave my binder open on the table all day long so I can check things off my list.  I love making those check marks.
     
    So my cleaning schedule that I have created consists of this:
    Monday:  Clean hardwood floors
                     Clean master bath
                     Vacuum upstairs

    Tuesday:  Dust upstairs
                     Clean kids bath
                     Vacuum Main level

    Wednesday:  Clean half bath
                          Dust Main level
                          Vacuum downstairs

    Thursday:  Dust downstairs
                      Clean downstairs bath
                      Wash bedding
                              Week 1 and 3- master and E's
                              Week 2 and 4- boys

    Friday:  Grocery shopping (yes, that is considered a chore in my world)
                  Wash windows
                               Week 1- upstairs
                               Week 2 - main level
                               Week 3- downstairs
                                Week 4- off

    Saturday and Sunday have been left open to have fun with the family or do other projects that don't need to be done weekly.  I also do laundry and dishes every day.  OH... and sweep my hardwood floors.  I hate crumbs.

    I just finished my chores for today,  my daily to do has everything checked off and I am ready to relax and enjoy an "at home date night" with my husband. 
    This is just a beginning draft of my chores.  I know that there is a possibility that I will have to add something, move something, take a day off... and I am OK with that.  Having a guide will hopefully keep me motivated and help me not to forget things.  There were a couple of times today that I thought I could just skip something.  The basement bath wasn't bad, the windows could wait for another time, but I kept going and pushing myself and the reward of a clean house (it was clean until the kids came home from school;)  is well worth the work and effort.

    So.... I'm curious.  Do you have a cleaning schedule?  How long have you had it and have you kept up with it?  Am I missing something on my list?  I would love to hear your responses!!!

    Wednesday, January 4, 2012

    ~Double Chocolate Brownies~

    Can't eat just one.  Trust me.... I tried.....and failed......miserably.  Elizabeth actually named these herself and since she is the one who makes them, I let her name them, and lick the spoon, and the bowl, and take the first taste test, because that is what the cooks get to do:)

    Ingredients:
    1 1/2 C sugar
    3/4 C flour
    3/4 C cocoa powder
    3 eggs
    3/4 C butter, melted
    3/4 C chocolate chips


    Directions:  Mix everything but the chocolate chips


    Add the chocolate chips

    Mix again


    Pour into a greased 9x13 pan


    Lick the spoon

    Bake in 350* preheated oven for 20-30 minutes


    Then lick some more!!!

    The finished product was eaten before a picture could be taken.  YES, they are THAT good!